With Apache Wicket there exists a component based Web Framework which supports the new WebSocket protocol.
I want to give you a short introduction to Apache Wicket with the focus on the new WebSocket Support. It will be explained by developing a little real-time chat application in 7 steps.
As I mentioned in my previous article WebSocket versus Comet, there are good reasons using the new WebSocket protocol.
There are some Web Frameworks supporting this new protocol in their technology stack.
Introduction
There are different kinds of Web Frameworks around. With JSF there exists one of the most popular component-based frameworks, which is the standard in Java.
But there are also famous action-based Frameworks like Struts or Spring MVC.
Apache Wicket is another proprietary component-based Web Framework. Because Apache Wicket is not a JSR standard, there are not many component libraries around like for JSF.
Though there are good reasons to choose Apache Wicket. The technology fully supports the Separation of Concerns Pattern.
While a Web Designer can concentrate on developing the design with CSS and HTML, the Java Developer is able to focus on the logical part of the application.
There are no dependencies between the Web Designer and the Java Developer. Only the Mapping between the Frontend and the Backend is done by wicket-ids in form of html attributes. The website remains fully HTML conform and can be used by every HTML editor.
Because of the clear separation and the use of components, the framework is very flexible and mainly supports maintainability, testability and re-usability.
There are also further reasons why to have a look at this framework, which I do not further concentrate on, but you can read the complete list of features here.
WebSocket Introduction
WebSocket is a new technology, which extends the HTTP paradigm of common web application Projects allowing:
- not only the Client to request for data but
- also push data from the Server to the Client.
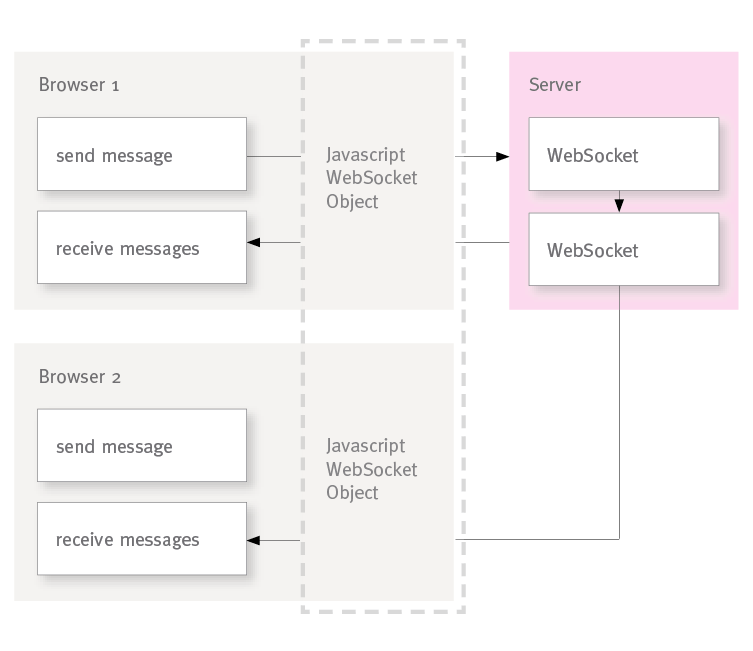
I will not introduce the complete WebSocket technology, but you can read this article to get a better introduction to WebSockets and how to write a WebSocket-based Java web application without a Web Framework. In the diagram below, you can see the construction of our web application:
At this time there is only an experimental module in Apache Wicket supporting WebSockets. The full documentation you can read here
The easiest way to make your first web application with Apache Wicket WebSocket is to read the following 6 steps showing how to implement a real-time chat application.
Create a Wicket real-time chat application with WebSockets in 7 steps
On the way to our web application with the new WebSocket support, I will concentrate on the WebSocket support and not on the creation of the Wicket web application. Therefore I am using the Eclipse Development Environment with the use of Maven and an Apache Wicket archetype quickstart with the version 6.11.0:
Step 1 – create an Apache Wicket web application with the version 6.11.0
In Eclipse – create a new Maven project and choose the Apache Wicket quickstart archetype with the version 6.11.0. Simply add this archetype if it is not supported. After the creation of a quickstart application you should be able to start the application by executing the Start.class in the test-package. It will start a Jetty server on port 8080 with the deployed quickstart web application. Now you should be able to connect to it on port 8080.
Get the New WebSocket Support
Step 2 – Add New Maven Dependency
After the project is created, you should add the new WebSocket native support for the Jetty server by adding the following lines to the POM file:
<dependency>
	<groupId>org.apache.wicket</groupId>
	<artifactId>wicket-native-websocket-jetty</artifactId>
	<version>0.12</version>
	<scope>provided</scope>
</dependency>
Step 3 -Add the WebSocket Filter to the web.xml
<filter>
	<filter-name>ws</filter-name>
	<filter-class>org.apache.wicket.protocol.ws.jetty.Jetty7WebSocketFilter</filter-class>
	<init-param>
		<param-name>applicationClassName</param-name>
		<param-value>martin.wicket.quick2.WicketApplication</param-value>
	</init-param>
</filter>

<filter-mapping>
	<filter-name>ws</filter-name>
	<url-pattern>/*</url-pattern>
</filter-mapping>
Step 4 – Use SelectChannelSelector instead of SocketConnector
To support the new WebSocket feature for the Jetty server, you have to instantiate a connector of type SelectChannelSelector instead of type SocketConnector in the Start.class.
Now you should have a complete environment to use the new WebSocket technology inside the Wicket application.
Let us start to implement our chat application.
Implementation of the real-time chat application
Step 5 – Create the HTML Page
Our Page contains one input-field and a send-button to send some messages to all connected clients. All messages from connected clients will be immediately shown inside a textarea field. You can replace the complete auto-generated HomePage.html by the following lines:
<html xmlns:wicket="http://wicket.apache.org">
	<head>
		<meta charset="utf-8" />
		<title>Apache Wicket Quickstart</title>
	</head>
	<body>
		<div>
			<input id="field" type="text" />
			<input wicket:id="button" type="button" value="send"><br></br>
			<textarea id="area" rows="6" cols="40"></textarea>
		</div>
	</body>
</html>
If you are wondering why there are only a few lines of code necessary, this is one advantage of Wicket. This HTML page can read by every HTML-Editor and a Web Designer has nothing to do with other logical code and can concentrate on the design of the page.
Step 6 – Add WebSocketBehavior to the Default HomePage
Now that the UI is implemented and the Designer can take care of the design, we have to implement the logic for the chat application.
With the new WebSocket support it is very easy to develop the real-time web application. The Java code of the default homepage is placed in HomePage.java which has to be changed. First lets remove the logical code that was used by the default HMTL page by removing the complete content of the HomePage constructor. All further implementation is done in this constructor.
Now we add the WebSocketBehavior to the page. With this behavior our Page is able to send messages from the client via a WebSockt and JavaScript to the server. By default a WebSocket connection from a client to the server will be automatically started. Later we can receive and send messages via this open WebSocket in JavaScript.
On the server-side we have to decide what to do with incoming messages from the client. Therefore we implement the onMessage() /onConnect() and onClose() methods. The onMessage() method will send the incoming message to all connected clients. The onConnect() method will send a message that a new client is connected:
add( new WebSocketBehavior() {
	@Override
	protected void onMessage(WebSocketRequestHandler handler,
			TextMessage message) {
		super.onMessage(handler, message);
		sendToAllConnectedClients(  message.getText()+"\n");
	}

	@Override
	protected void onConnect(ConnectedMessage message) {
		super.onConnect(message);
		sendToAllConnectedClients( "new client connected: "+getConnectedClients().size()+"\n");
	}

	@Override
	protected void onClose(ClosedMessage message) {
		super.onClose(message);
		sendToAllConnectedClients( "client disconnected: "+(getConnectedClients().size()-1)+"\n");
	}
});
As you can see, we need the self-explanatory sendToAllConnectedClient- and getConnectedClients-Methods:
private Collection<IWebSocketConnection> getConnectedClients(){
	IWebSocketConnectionRegistry registry = new SimpleWebSocketConnectionRegistry();
	return registry.getConnections( getApplication());
}

private void sendToAllConnectedClients( String message){
	Collection<IWebSocketConnection> wsConnections = getConnectedClient();
	for( IWebSocketConnection wsConnection : wsConnections){
		if (wsConnection != null && wsConnection.isOpen()) {
			try {
					wsConnection.sendMessage( message);
			} catch (IOException e) {}
		}
	}
}
Step 7 – Implementation of the Client Logic in Java on the server-side
Now we have finished the implementation on the server-side and you may wonder how to implement the client logic because our html-page is still created. That is one of the big differences compared to other Web-Frameworks. We are now able to implement the client-side logic also on the server-side in Java.
If we push the send-button on the client, we want to send the message in the input field to the server via the new WebSocket technology. All we have to do is to add the following lines of code to the HomePage-constructor:
Button sendButton = new Button( "button" );
sendButton.add(new AttributeAppender("onclick", new Model("Wicket.WebSocket.send( document.getElementById('field').value)"), ";"));
add(sendButton);
The link between the button on the html-page and the button-object in Java is done by the previous mentioned wicket-id “button”.
After that we can manipulate the button in Java by adding a JavaScript onclick() function. This function uses the input field and sends its content via the open WebSocket to the server.
That is it, now we can send the message to the server, but now we should receive messages on the client-side shown in the textarea-field.
To do this we just need to override the following function in the HomePage class:
@Override
public void renderHead(IHeaderResponse response){
	super.renderHead(response);
	String javaScript = "Wicket.Event.subscribe('/websocket/message', function(jqEvent, message) {var messagesArea = document.getElementById('area');messagesArea.value =  message + messagesArea.value;});";
	response.render( OnLoadHeaderItem.forScript( javaScript));
}
In this method we can place the JavaScript-Code which is added an executed as Head element on the HTML page. Here we subscribe a Wicket-Event and can react on such an event by appending the incoming message to the textarea field via JavaScript.
We have just implemented our first real-time Wicket chat application with WebSockets.
Conclusion
The WebSocket technology is that powerful that even a good web framework like Apache Wicket supports it. I am almost sure that this experimental support will be improved and better supported in the future by Apache Wicket. Hopefully I could show that it can be very profitable to invest in the new WebSocket technology. I have not concentrated on the benefits of Apache Wicket, but eventually you could see some advantages of Apache Wicket, anyway.
If you are further interested in the WebSocket technology you can check this article.