The first part of this Blog gave you a look into the history of Java build tools and the deficiencies of the two most common tools, Ant and Maven. This second and the third part will now show how Gradle works and why it sets a new level for Java build tools.
Gradle is Like Ant, Just Better
Like Ant, Gradle uses build scripts which define named build steps. Build steps can be executed by specifying their names as command line arguments for the tool. By default the tools will look for a build script in the current directory (build.xml for Ant, build.gradle for Gradle) to find the build step definitions.
While Ant names such a step “target”, Gradle uses the term “task”. Ant users should be careful not to confuse the two different meanings of “task”: A Gradle “task” corresponds to an Ant “target”. An Ant “target” defines a sequence of Ant “tasks” to be executed when the target is executed. Likewise a Gradle “task” defines a sequence of Groovy statements to be executed when the task is executed. As you will see below, one can actually execute Ant tasks as part of the Groovy statements defined by the Gradle task.
Other than Ant’s custom XML language, Gradle scripts are essentially Groovy scripts. This makes for a much more readable and powerful build scripting experience.
Gradle Hello-World
The power of Gradle is best experienced by examining some practical examples. I am sure you can guess what our first Gradle build will do:
println "Setup tasks ..."

task sayHello {
  group = 'Hello'
  description = 'This task says hello.'

  doLast {
    println "Hello world!"
  }
}

println "Our tasks have been setup."
Gradle provides a number of built-in tasks. One is the tasks command which will show a list of tasks available for the project:$ gradle tasks
Setup tasks …
Our tasks have been setup.
:tasks
————————————————————
All tasks runnable from root project
————————————————————
Build Setup tasks
—————–
setupBuild – Initializes a new Gradle build. [incubating]
wrapper – Generates Gradle wrapper files. [incubating]
Hello tasks
———–
sayHello – This task says hello.
Help tasks
———-
dependencies – Displays all dependencies declared in root project ’testproject1′.
dependencyInsight – Displays the insight into a specific dependency in root project ’testproject1′.
help – Displays a help message
projects – Displays the sub-projects of root project ’testproject1′.
properties – Displays the properties of root project ’testproject1′.
tasks – Displays the tasks runnable from root project ’testproject1′.
To see all tasks and more detail, run with –all.
BUILD SUCCESSFUL
Total time: 2.745 secs
$
The output includes our custom sayHello task in the Hello section. (Gradle takes the section name from the group property which we configured for the task.) The other tasks are predefined by Gradle and available in every build script. (As you will see below, it is easy to modify existing tasks; so if you wanted to, you could extend, completely replace or even delete these predefined tasks.)
The careful observer will note that some task descriptions contain the name testproject1 for our project though we never declared this in our build script. Gradle (unless otherwise configured) will take the name of the directory containing the build script for the project name (which happened to be testproject1 in this case). This gives you a peek preview of Gradles implementation and extension of Mavens “conventions”.
After having seen the build script code and Gradles tasks listing, actually executing sayHello does not yield any surprises:$ gradle sayHello
Setup tasks …
Our tasks have been setup.
:sayHello
Hello world!
BUILD SUCCESSFUL
Total time: 2.344 secs
$
More Gradle Magic
Let another build script give you an idea of Gradles power, mostly based in its Groovy roots:
// You can use the full power of Groovy inside your tasks. Note that the '<<'
// operator for Gradle Task objects is mapped to the 'doLast(...)' method using
// Groovys operator overloading:
task countToFour << {
  4.times { println "Counting: ${it + 1}" }
}

// Similar to the 'depends' attribute of targets in Ant, you can declare
// dependencies between tasks in Gradle:
task gradleIntro (dependsOn: countToFour) << {
  println "I'm Gradle."
}

// If you need to depend on a task which is not yet defined, you may forward
// reference it using its name:
task taskY (dependsOn: 'taskX') << {
  println "Task Y"
}

task taskX << {
  println "Task X"
}

// Tasks don't need to be statically predefined; they can be created dynamically:
4.times { counter ->
  task "dynamic-task-$counter" << {
    println "I'm dynamic task number $counter."
  }
}

// Tasks are simply Groovy objects stored in a 'tasks' map in the buildscript
// object (which itself is just a Groovy object). You can reference tasks which
// have already been created (by your buildscript or as a predefined default
// task) and modify them; for example by adding action closures before or after
// the existing closures:
tasks['dynamic-task-1'].doFirst { println 'Before!' }
tasks['dynamic-task-1'].doLast { println 'After!' }

// ... or by adding dependencies to some existing task. Note that since the task
// name is a valid Java/Groovy identifier, this time we directly reference 'taskY'
// defined above instead of using the 'tasks' map:
taskY.dependsOn countToFour

// Other than Ant, Gradle builds a real "Directed Acyclic Graph" ("DAG") from
// the requested tasks and their dependencies, making sure that each task is
// only executed once. Therefore the 'fullIntro' below will count to four
// only once and not twice (as it would be the case for a similar Ant script):
task gradleIntro2 (dependsOn: countToFour) << {
  println "I'm Gradle again."
}

task fullIntro (dependsOn: [ gradleIntro, gradleIntro2 ]) << {
  println "This was the full Gradle intro."
}

// You might want to define some task(s) which is/are executed by default when
// the user does not specify any tasks on the command line:
defaultTasks 'dynamic-task-1', 'fullIntro'
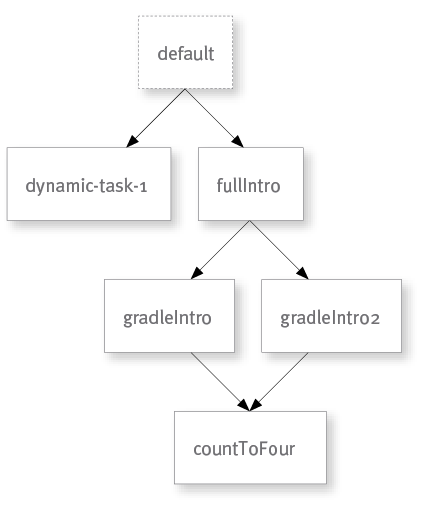
Most of these examples have been insipired by the excellent Gradle User Guide. I will save us from including the outputs for all of these tasks, just let me demonstrate the default tasks specified on the last line by executing the gradle command without any arguments:$ gradle
:dynamic-task-1
Before!
I’m dynamic task number 1.
After!
:countToFour
Counting: 1
Counting: 2
Counting: 3
Counting: 4
:gradleIntro
I’m Gradle.
:gradleIntro2
I’m Gradle again.
:fullIntro
This was the full Gradle intro.
BUILD SUCCESSFUL
Total time: 3.857 secs
$
As you can see, Gradle builds the following DAG of tasks to execute:
There is literally no aspect in Gradle where you could not plugin your customizations. Here is another impressing example right from the manual:
task distribution << {
  println "We build the distribution ZIP with version '$version'."
}

task release (dependsOn: 'distribution') << {
  println 'We release now.'
}

gradle.taskGraph.whenReady { taskGraph ->
  if (taskGraph.hasTask(release)) {
      version = '1.0'
  } else {
      version = '1.0-SNAPSHOT'
  }
}
If the release task is executed, we set a release version, otherwise it will be a snapshot version:$ gradle distribution
:distribution
We build the distribution ZIP with version ’1.0-SNAPSHOT’.
BUILD SUCCESSFUL
Total time: 2.539 secs
$ gradle release
:distribution
We build the distribution ZIP with version ’1.0′.
:release
We release now.
BUILD SUCCESSFUL
Total time: 2.457 secs
$
But I Like the Ant Tasks …
Ant’s killer feature is the big collection of built-in and third party tasks (not to be confused with Gradle tasks). You will find an Ant task for every action needed in a build script from simply copying a file to remote controlling clusters of application servers.
In Gradle you can (and should) replace many of these tasks by directly using regular Groovy code, special Gradle features or by using libraries from your build script through their Java/Groovy API. However, there might be cases where you still want to use one or the other Ant task. Because Groovy has Ant already built in (in the form of a Groovy “builder”) this is easy in Gradle. And since Gradle/Groovy uses a Java based syntax instead of XML it is even easier to read than comparable Ant code:
task checksum << {
  // The file(...) method is a Gradle builtin which resolves and normalizes paths
  // relative to the project root directory (like Ants 'location' properties):
  def buildfile = file('build.gradle')

  // Here we execute the Ant task 'checksum' using Groovy's Ant builder:
  ant.checksum(file: buildfile, property: 'buildfile_cs')

  // Accessing the Ant properties is not terribly elegant compared to "native"
  // Gradle properties:
  println "Checksum of '$buildfile.name': ${ant.properties['buildfile_cs']}"
}
Organizing Your Build Logic
One area where Ant falls short (see Part 1 of this Blog) is organizing the build logic, which, as for any other software project, tends to grow more complex in time. Where Ant fails Gradle shines.
Even putting all your build logic in a single build script works much better with Gradle than with Ant. Already the Java based Groovy syntax is much easier to read and write than Ants XML, especially for Java developers already used to this syntactic style. And your source essentially defines a Groovy class; apart from the coarse grained Gradle tasks you can also specify all the elements of structuring code and statements within a class you already know as a Java programmer, from methods to inner classes, from for loops and if statements to conditional expressions and even annotations.
The following build script will not only demonstrate the use of an inner class to extend a Java class from a third party library, it will also give you a peek on using the Maven Central repository to download dependencies:
// We start out with just using a custom Hamcrest matcher in a Gradle task and
// hide all the gory details at the end of the script:
task testMyMatcher << {
  assertThat(Math.sqrt(-1), is(notANumber()))
  assertThat(1.0, is(notANumber()))
}

// We define an inner class of the build script to implement a custom Hamcrest
// matcher. The code is borrowed without changes from the Hamcrest Tutorial
// (https://code.google.com/p/hamcrest/wiki/Tutorial):
public class IsNotANumber extends TypeSafeMatcher<Double> {
  @Override
  public boolean matchesSafely (Double number) {
    return number.isNaN();
  }

  public void describeTo (Description description) {
    description.appendText("not a number");
  }

  @Factory
  public static <T> Matcher<Double> notANumber () {
    return new IsNotANumber();
  }
}

// The buildscript method allows to configure the classpath of the build script
// itself (as opposed to the classpath(s) of the project _built_ by the build
// script):
buildscript {
  // We rely on the (in)famous Maven Central repository, which already comes
  // built into Gradle, so we just have to activate it:
  repositories {
      mavenCentral()
  }

  // Now we can define our third party dependencies, in this case the Hamcrest
  // matcher library (https://code.google.com/p/hamcrest/). Note that the
  // 'hamcrest-core' library is already available on the classpath (as part of
  // JUnit), so we only need to add the 'hamcrest-library' containing additional
  // "convenience" classes like 'Matchers'.
  // The version 1.3 comes from the Gradle version I use for this Blog, which
  // happens to be Gradle 1.7 containing JUnit 4.11 depending on Hamcrest 1.3.
  // It is important to match the correct version, otherwise you will mix
  // different versions of the Hamcrest library on the same classpath which is
  // a guaranteed recipe for disaster.
  dependencies {
      classpath group: 'org.hamcrest', name: 'hamcrest-library', version: '1.3'
  }
}

// You can import any Java and Groovy classes from the Gradle API or third
// party dependencies. Groovy makes it possible to move this (rather uninteresting)
// section to the bottom of the script:

import static org.hamcrest.MatcherAssert.assertThat
import static org.hamcrest.Matchers.*

// To make the code of the 'testMyMatcher' task better readable, we also import
// the static factory method of our own custom Matcher class:
import static IsNotANumber.notANumber

import org.hamcrest.Description
import org.hamcrest.Factory
import org.hamcrest.Matcher
import org.hamcrest.TypeSafeMatcher
Thanks to Groovy, which processes most Java code without modifications, I could simply copy the Java sample implementation of a IsNotANumberMatcher from the Hamcrest tutorial right into my buildscript.
Executing the testMyMatcher task, as you probably expected, results in a failure of the second assertion:$ gradle testMyMatcher
Download http://repo1.maven.org/maven2/org/hamcrest/hamcrest-core/1.3/hamcrest-core-1.3.pom
Download http://repo1.maven.org/maven2/org/hamcrest/hamcrest-parent/1.3/hamcrest-parent-1.3.pom
Download http://repo1.maven.org/maven2/org/hamcrest/hamcrest-core/1.3/hamcrest-core-1.3.jar
Download http://repo1.maven.org/maven2/org/hamcrest/hamcrest-library/1.3/hamcrest-library-1.3.pom
Download http://repo1.maven.org/maven2/org/hamcrest/hamcrest-library/1.3/hamcrest-library-1.3.jar
:testMyMatcher FAILED
FAILURE: Build failed with an exception.
* Where:
Build file ’/home/zisch/doc/psw/blog/blog-2013-ab.Gradle_to_the_Rescue.Part_2/gradle-test-tasks/testproject5/build.gradle’ line: 5
* What went wrong:
Execution failed for task ’:testMyMatcher’.
> java.lang.AssertionError:
Expected: is not a number
but: was a java.math.BigDecimal (<1.0>)
* Try:
Run with –stacktrace option to get the stack trace. Run with –info or –debug option to get more log output.
BUILD FAILED
Total time: 5.466 secs
$
Note that Gradle will download the dependencies only if they have not been downloaded before. Very similar to Maven, Gradle will by default cache all downloaded libraries in a .gradle directory in the users home directory.
However, rather sooner than later your single build script will grow too complex despite the improvements brought by Gradle. Similar to Ant you could then split the logic into multiple scripts calling each other.
But Gradle has a much better way to deal with growing complexity: Each Gradle root project has an implicit “meta project” in a folder called buildSrc. If such a folder exists in the project about to be built, Gradle will assume that it contains a regular Gradle project itself and use a default build script with dependencies to the Gradle API. (The default build script will apply the Groovy “plugin”, setting up a standard Groovy project with a project layout similar to a Maven project and with all necessary tasks to compile the sources and build the meta project. The next chapter comparing Gradle with Maven will give you a more detailed insight into the functionality of Gradle plugins.)
So, if we wanted to break down our monolithic buildscript from above, we could create a file buildSrc/src/main/java/mybuild/IsNotANumber.java to contain our IsNotANumber class. For this we simply copy the code from the buildscript and the necessary imports to the Java file and add a package declaration. (Groovy classes on the other hand would go into buildSrc/src/main/groovy.)
Gradle also allows to extend the default build script for the meta project. By moving the buildscript dependencies from build.gradle to buildSrc/build.gradle, we end up with a nice, clean main buildscript build.gradle:
task testMyMatcher << {
  assertThat(Math.sqrt(-1), is(notANumber()))
  assertThat(1.0, is(notANumber()))
}

import static org.hamcrest.MatcherAssert.assertThat
import static org.hamcrest.Matchers.*
import static mybuild.IsNotANumber.notANumber
The corresponding buildSrc/build.gradle to define the meta project
dependencies is simple as well:
repositories {
  mavenCentral()
}

dependencies {
  runtime group: 'org.hamcrest', name: 'hamcrest-library', version: '1.3'
}
Putting it all together, executing the testMyMatcher task yields the same result as before, but, as you can see, before starting the actual build, the meta project in buildSrc containing our IsNotANumber matcher is built:$ gradle testMyMatcher
:buildSrc:clean
:buildSrc:compileJava
:buildSrc:compileGroovy UP-TO-DATE
:buildSrc:processResources UP-TO-DATE
:buildSrc:classes
:buildSrc:jar
:buildSrc:assemble
:buildSrc:compileTestJava UP-TO-DATE
:buildSrc:compileTestGroovy UP-TO-DATE
:buildSrc:processTestResources UP-TO-DATE
:buildSrc:testClasses UP-TO-DATE
:buildSrc:test UP-TO-DATE
:buildSrc:check UP-TO-DATE
:buildSrc:build
:testMyMatcher FAILED
FAILURE: Build failed with an exception.
* Where:
Build file ’/home/zisch/doc/psw/blog/blog-2013-ab.Gradle_to_the_Rescue.Part_2/gradle-test-tasks/testproject6/build.gradle’ line: 3
* What went wrong:
Execution failed for task ’:testMyMatcher’.
> java.lang.AssertionError:
Expected: is not a number
but: was a java.math.BigDecimal (<1.0>)
* Try:
Run with –stacktrace option to get the stack trace. Run with –info or –debug option to get more log output.
BUILD FAILED
Total time: 10.2 secs
$
The examples up to now should have convinced you that Gradle is certainly an improvement over Ant. But actually we just scratched the surface. The third part will show how Gradle compares to Maven.