After a look into the history of Java build tools in the first part and a comparison of Gradle with Ant in the second part of this blog, we will now check if Gradle is a serious competition for Maven.
Gradle is Like Maven, Just Better
“All well”, you might say after reading the last part, “but I’m really long past Ant. I’m using Maven, and I don’t intend to go back to the point where I have to programmatically define my own tasks to do such mundane things like compile my Java sources. And I certainly expect a serious dependency handling from my build tool of choice.”
I fully agree and would like to demonstrate you the Gradle version of a buildfile for a full fledged Java project:
apply plugin: 'java'
Really. That’s it. You already know the layout from Maven. Just put your sources into src/main/java, your unit test code into src/test/java and so on. Then execute gradle build and Gradle will compile the sources, execute unit tests and package the JAR file.
For comparison, let’s have a look at an equivalent Maven POM:
<!--?xml version="1.0"?-->

  4.0.0

  com.acme.testprojects
  javaproject1-maven
  1.0
  jar
And the winner is: Gradle.
Gradle Plugins and Conventions
Well, the contest was not entirely fair. On one hand, Mavens default packaging is jar, so we could make the Maven script one line shorter.
And while the Gradle script does not need to define the artifactId (which defaults to the containing directories name), it also omits the group and version properties. While Maven forces you to specify a group and version as part of the basic “coordinates” of each Maven project, Gradle doesn’t care as long as you do not need these values.
However, if you want, you can specify a group and a version, and also a description, since these are all standard properties of a Gradle project. Using such standard properties, you could also override the default project name:
apply plugin: 'java'
group = 'com.acme.tesproject'
name = 'javaproject1-gradle'
version = '1.0'
Now, this looks more like the Maven POM from above, but it is still much easier to read.
Frankly, compared to Maven POM attributes there are not that many standard properties in a project. (You already saw most of them in the short script above.) There are no properties for a project URL, licenses, developer contact information and what else a Maven POM might contain.
But on one hand Gradle tasks can have properties on their own, which sometimes replace what would be a POM attribute in Maven. On the other hand, both, Gradle projects and tasks can also have arbitrary user defined properties (“extra properties”). (These roughly correspond to the Maven properties defined in the <properties> section.)
However most project properties in Gradle are injected by the Gradle “plugins” applied to the project; in Gradle lingo these are called “convention properties”.
Gradle plugins are the cornerstone of the “Maven-like” configuration, even though the corresponding Java interface is extremely simple:
public interface Plugin {
    public void apply (T target);
}
That’s really all that happens: you say
apply plugin: SOMEPLUGIN
where SOMEPLUGIN is for example a predefined plugin ID, such as java, groovy, ear or jetty, or the name of some Java/Groovy class implementing the Plugin interface. As a Java programmer you might wonder about the exact semantics of the apply plugin statement, but if you know Groovy, it is actually not difficult to translate this to “pure Java” by inserting missing punctuation (optional in Groovy but mandatory in Java) and replacing Groovy’s built-in map creation with the explicit use of the Collections utility:
this.apply(Collections.singletonMap("plugin", SOMEPLUGIN));
The this here represents the project object. The projects apply method will create an instance of the plugin and then call the plugins apply implementation specifying itself as the target.
The plugin “applied” this way is free to do anything which, for example, could be done in the build.gradle script itself, like modifying project tasks, setting project properties or even apply other plugins to the project.
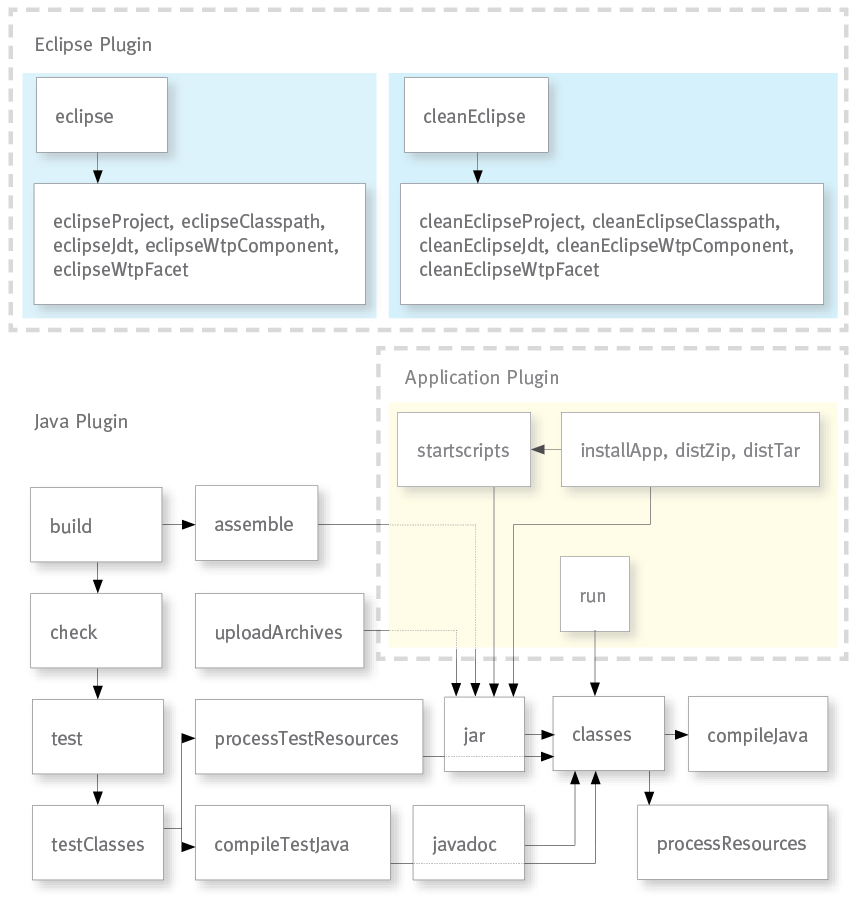
Other than the exclusive Maven “packaging” you can apply any number of plugins to a project. If you want to setup a Java project which produces a command line application and use Eclipse as your IDE, you would probably start out with something like this:
apply plugin: 'java'
apply plugin: 'eclipse'
apply plugin: 'application'

// This is the only mandatory configuration and tells the 'application' plugin
// which class to execute when running the application:
mainClassName = 'testproject7.MyMain'
The java plugin adds everything needed for a Java project, the eclipse plugin enables generation of Eclipse classpath and project configuration by Gradle and the application plugin allows running a Java application from the build directory, generating start scripts for Unix and Windows and packing the application with runtime libraries and start scripts into a distribution archive. The task list resulting from these four lines of code is quite impressive:$ gradle tasks
:tasks————————————————————
All tasks runnable from root project
————————————————————Application tasks
—————–
distTar – Bundles the project as a JVM application with libs and OS specific scripts.
distZip – Bundles the project as a JVM application with libs and OS specific scripts.
installApp – Installs the project as a JVM application along with libs and OS specific scripts.
run – Runs this project as a JVM application
Build tasks
———–
assemble – Assembles the outputs of this project.
build – Assembles and tests this project.
buildDependents – Assembles and tests this project and all projects that depend on it.
buildNeeded – Assembles and tests this project and all projects it depends on.
clean – Deletes the build directory.
jar – Assembles a jar archive containing the main classes.
Build Setup tasks
—————–
setupBuild – Initializes a new Gradle build. [incubating]
wrapper – Generates Gradle wrapper files. [incubating]
Documentation tasks
——————-
javadoc – Generates Javadoc API documentation for the main source code.
Help tasks
———-
dependencies – Displays all dependencies declared in root project ‘testproject7′.
dependencyInsight – Displays the insight into a specific dependency in root project ‘testproject7′.
help – Displays a help message
projects – Displays the sub-projects of root project ‘testproject7′.
properties – Displays the properties of root project ‘testproject7′.
tasks – Displays the tasks runnable from root project ‘testproject7′.
IDE tasks
———
cleanEclipse – Cleans all Eclipse files.
eclipse – Generates all Eclipse files.
Verification tasks
——————
check – Runs all checks.
test – Runs the unit tests.
Rules
—–
Pattern: build<ConfigurationName>: Assembles the artifacts of a configuration.
Pattern: upload<ConfigurationName>: Assembles and uploads the artifacts belonging to a configuration.
Pattern: clean<TaskName>: Cleans the output files of a task.
To see all tasks and more detail, run with –all.
BUILD SUCCESSFUL
Total time: 1.488 secs
$
As long as you setup your project according to the default layout (which is more or less what you know already from Maven), all these tasks will work “out of the box” and you are ready to build, test and package your application. You will still have to write the code for your program by yourself, though.
A nice touch is that Gradle always keeps track as to which plugins have been applied to a project and will simply skip repeated application. The war and the groovy plugin for example will both apply the java plugin before adding their own refinements and extensions. But you can still apply both of them (and the java plugin on top, if you like so); Gradle will sort it all out.
Maybe the most crucial ability of plugins is to inject the “convention properties” already mentioned. For example, applying the Java plugin will result in numerous additional properties which can be used like the standard project properties (name, version etc.). Using these properties, “source sets” and other extensions added by the plugin, you can modify the location of sources and generated output or influence other aspects of the Java build such as Java source and target versions for the compiler.
While you can reconfigure all the plugin’s defaults with Gradle, the same general rule applies to configuration and customization as in Maven projects: If you anyhow can, stay with the predefined defaults and safe yourself a lot of work. However, if you really feel the need to customize the Gradle plugins, you will find that Gradle makes this as painless for you as possible.
Apart from the Groovy power shown in the previous sections, most of Gradle’s appeal comes from the plugins included in the Gradle distribution. The following list might whet your appetite:
- The Java Plugin: Compiles Java projects and packages the classes to JAR archives, also executes unit tests and defines classpaths for compile, test and runtime.
- The Groovy Plugin: Extends the Java plugin with everything needed to build Groovy projects.
- The Scala Plugin: Obviously to build Scala projects.
- The War and Ear Plugins: Build WARs and EARs.
- The Jetty Plugin: Executes your WAR projects in an embedded Jetty server.
- The Checkstyle, CodeNarc, FindBugs, JDepend, PMD, JaCoCo and Sonar Runner Plugins: These apply the corresponding quality/code-metric tools to your project.
- The OSGi Plugin: Helps you to build OSGi projects.
- The Eclipse and IDEA Plugins: Generate project configuration for these IDEs using dependency information etc. from the Gradle projects.
- The ANTLR Plugin: For code generation using ANTLR 2.
- The ProjectReport and Build Dashboard Plugins: Generate reports and a dashboard for the project. The report is currently rather “thin”, but future extensions are planned. (I guess this is intended to, some day, rival Mavens “site generation” feature.)
- The Announce and Build Announcements Plugins: To publish your build events to Twitter, notify-send, Snarl or Growl.
- The Distribution and Java Library Distribution Plugins: Help to build archived distributions of your projects.
- The Application Plugin: Extends language plugins (such as
java,groovyorscala) with functionality to create command line start scripts, run your program as an application or package a binary distribution of the application. - The Build Setup and Wrapper Plugins: Help to bootstrap new projects and embed Gradle into the project, so the project can be built anywhere without the need to install Gradle (or a specific Gradle version) at all.
- The Maven Plugin: Publishes artifacts to Maven repositories.
- The Signing Plugin: Digitally sign generated artifacts.
- There is some C++ support, but I have no idea how usable this already is.
Personally I only used a few of all these plugins yet, but even in pre-1.0 versions of Gradle I rarely ever encountered a bug in a plugin (or anywhere else in Gradle). The plugins were usually quite feature-complete, very usable, well documented and (maybe even more important) they actually worked as documented.
Dependency Management
You already saw how to access a dependency from the Maven Central repository with Gradle. Gradles dependency management is based on Apache Ivy. If you know Ivy, you already know that Ivy can do everything the Maven dependency mechanisms can do (including accessing Maven repositories), and then much more.
Other than Maven, a Gradle project is not restricted to a fixed set of “scopes” (compile, runtime etc.) but may define any number of “dependency configurations” (Ivys closest equivalent to Maven scopes). This is a welcome feature, even though in your average standard Java project you will simply use the configurations predefined by the Java plugin, which are very similar to Maven:
compile: Compile time dependencies.runtime: Runtime dependencies. (Extendscompile.)testCompile: Additional dependencies for compiling test classes. (Extendscompile.)testRuntime: Additional dependencies for running tests. (ExtendsruntimeandtestCompile.)archives: Publishable artifacts produced by this project.default: The default dependency used by a project dependency on this project which does not define a specific configuration. (Extendsruntime.)
In the example using the Hamcrest library you already saw how to add a dependency to the compile and runtime classpath of the buildscript itself. Adding dependendencies of all kinds for a project itself is equally easy as this snippet from the Gradle manual demonstrates:
dependencies {
    // Different variants of how to define dependencies from remote or local
    // repositories:
    runtime group: 'org.springframework', name: 'spring-core', version: '2.5'
    runtime 'org.springframework:spring-core:2.5', 'org.springframework:spring-aop:2.5'
    runtime(
        [group: 'org.springframework', name: 'spring-core', version: '2.5'],
        [group: 'org.springframework', name: 'spring-aop', version: '2.5']
    )
    runtime('org.hibernate:hibernate:3.0.5') {
        transitive = true
    }
    runtime group: 'org.hibernate', name: 'hibernate', version: '3.0.5', transitive: true
    runtime(group: 'org.hibernate', name: 'hibernate', version: '3.0.5') {
        transitive = true
    }

    // Client module dependencies enable you to declare transitive dependencies
    // directly in your build script:
    runtime module("org.codehaus.groovy:groovy-all:2.0.5") {
        dependency("commons-cli:commons-cli:1.0") {
            transitive = false
        }
        module(group: 'org.apache.ant', name: 'ant', version: '1.8.4') {
            dependencies "org.apache.ant:ant-launcher:1.8.4@jar",
                         "org.apache.ant:ant-junit:1.8.4"
        }
    }

    // As you might expect, it is also possible to declare a dependency on
    // another project in a multi project build:
    compile project(':shared')

    // How to define dependencies on plain JAR files (or directories) in your
    // project directory:
    runtime files('libs/a.jar', 'libs/b.jar')
    runtime fileTree(dir: 'libs', include: '*.jar')

    // If the artifact of your plain file dependency needs to be generated
    // by some task first, you can do something like this:
    compile files("$buildDir/pre-built-classes") {
        builtBy 'task-to-generate-pre-built-classes'
    }

    // If you develop Gradle plugins or other classes using the Gradle API
    // of your currently executing Gradle, you can declare a dependency to
    // the complete Gradle API or just the Groovy implementation included
    // in your Gradle distribution:
    compile gradleApi()
    compile localGroovy()
}
The example should give you good impression of Gradles flexibility when it comes to dependency handling, even though I left out some features such us using Ivy configurations or excluding transitive dependencies.
Once declared, many existing plugins and tasks will make use of these project dependencies. And in your own buildscript code you can access and manipulate such dependencies like any other project property.
While Gradle (other than Maven) can easily work with a lib directory containing JAR files, typically you will want to use some local or remote repositories containing your dependencies. As with other aspects of dependency handling, Gradle lays only a thin layer over Ivy, so you can use all the various types of repositories which Ivy can access:
- Maven Central Repository: Looks for dependencies in Maven Central.
- Maven JCenter Repository: Looks for dependencies in Bintray’s JCenter.
- Maven Local Repository: Looks for dependencies in your local Maven repository.
- Maven Repository: Looks for dependencies in any Maven repository located on the local filesystem or at some remote location.
- Ivy Repository: Looks for dependencies in any Ivy repository located on the local filesystem or at some remote location.
- Flat Directory Repository: A simple repository consisting of a directory containing JAR files without any meta-data.
A project may define any number of repositories of any type:
repositories {
    // These should be mostly self explaining:
    mavenCentral()
    jcenter()
    mavenLocal()

    // An arbitrary Maven repository:
    maven {
        // Look for POMs and artifacts, such as JARs, here:
        url "http://repo2.mycompany.com/maven2"

        // If you want, you can specify additional URLs to look for artifacts
        // which are not found at the above location; very handy if you want to
        // "augment" a repository like Maven Central with additional source and
        // javadoc JARs or with license restricted JARs which are missing from
        // the public repo:
        artifactUrls "http://repo.mycompany.com/jars"
        artifactUrls "http://repo.mycompany.com/jars2"

        // You might have to use username and password to access the repository;
        // however, better (and not difficult) would be to define these in a
        // 'gradle.properties' possibly located in your home directory:
        credentials {
            username 'user'
            password 'password'
        }
    }

    // You can also use one or multiple flat filesystem directories in
    // your project (or anywhere else in the local filesystem) containing
    // some JARs:
    flatDir {
        dirs 'lib1', 'lib2'
    }

    // Last but not least an Ivy standard repository. I won't go into detail
    // here. If you know Ivy it will suffice to say that Gradle allows the
    // same options like Ivy itself:
    ivy {
        url "http://repo.mycompany.com/repo"
        layout "pattern", {
            artifact "[module]/[revision]/[type]/[artifact].[ext]"
        }
    }
}
I will not show here how Gradle allows fine-tuning dependency resolution or artifact caching strategies. I will also leave out uploading or publishing built artifacts to local or remote repositories. I think by now you get the picture and are able to deduce that these areas are handled in an equally elegant, versatile and flexible manner by Gradle like anything else.
Multi Project Builds
The typical Java project nowadays does not consist of a single source tree with a single set of dependencies compiled into a single JAR. Normally a project will have many “modules” or “subprojects” leading to a multi project build, which means some work with Ant and some pain with Maven.
Not so with Gradle, which has been designed from the beginning with multi project builds in mind. To understand how it works, it is helpful to know that a Gradle build has three distinct phases:
- In the initialization phase Gradle determines which projects take part in the build and creates a
Projectobject for each. - In the configuration phase the
Projectobjects are configured by executing the projectsbuild.gradlescripts. - In the execution phase Gradle determines the DAG of tasks to be executed and finally executes each of these tasks.
While the initialization phase is a no-brainer for the typical single-project build, in a multi project build Gradle will setup the project tree of affected projects in this phase. For this, Gradle will look for a settings.gradle script in the root project which is executed during the initialization phase. The main use of this script is to define all child projects of the project being initialized.
Child projects can be added by executing the include and includeFlat methods which both take arrays of logical paths to child projects:
// This example expects the following directory structure:
// rootdir/
//  +-- projectC/
//  +-- projectD/
//  +-- parent/
//       +-- projectA/
//       +-- subgroup/
//       |    +-- projectB/
//       |    +-- projectC/
//       +-- settings.gradle
//       +-- build.gradle

include 'projectA', 'subgroup:projectB', 'subgroup:projectC'
includeFlat 'projectD', 'projectE'
Note that only the “leaf” projects need to be specified. Gradle will create an implicit subgroup project for the parent of projectB and projectC.
While this does not handle completely arbitrary project layouts, it should be fine for all common needs. But Gradle allows for even more customization like redefining the root directory. And since the project tree is just a structure of common Groovy objects and Gradle allows you to plug your own functionality between initialization and configuration, the possibilities to do crazy stunts which are a mystery to everyone else are endless. (Note: If you feel the need to go down this road, you are most probably doing something wrong.)
Note that the build.gradle files for the subprojects are optional. You could certainly put a build script into each (or some) projectX folder to configure that project as shown earlier. However, Gradle also allows to “inject” configuration from one project into another. You can, just for example, write a single buildscript to configure all (sub)projects and put it in the root project:
// It is easy to apply a common configuration to all projects:
allprojects {
  // Here we create a new task named 'hello':
  task hello << {
    println "Hello from '${project.name}'."
  }
}

// You might want to configure just the subprojects:
subprojects {
  // Here we just reference the task created before:
  hello << {
    println "I'm a subproject."
  }
}

// Or configure just a specific project:
project(':projectA') {
  hello << {
    println "This is executed only for projectA."
  }
}

// If needed, you can filter the projects to configure with arbitrary Groovy
// expressions:
def pat = 'project[BD]'
configure(subprojects.findAll {it.name ==~ pat}) {
  hello << {
    println "Hello from a project with a name matching '${pat}'."
  }
}
Executing gradle hello in the parent directory will execute the hello task for all projects:$ gradle hello
:hello
Hello from ‘parent’.
:projectA:hello
Hello from ‘projectA’.
I’m a subproject.
This is executed only for projectA.
:projectD:hello
Hello from ‘projectD’.
I’m a subproject.
Hello from a project with a name matching ‘project[BD]‘.
:projectE:hello
Hello from ‘projectE’.
I’m a subproject.
:subgroup:hello
Hello from ‘subgroup’.
I’m a subproject.
:subgroup:projectB:hello
Hello from ‘projectB’.
I’m a subproject.
Hello from a project with a name matching ‘project[BD]‘.
:subgroup:projectC:hello
Hello from ‘projectC’.
I’m a subproject.
BUILD SUCCESSFUL
Total time: 1.443 secs
$
One thing you might notice is the somewhat random execution order of the different projects. Gradle let’s you influence this on several levels. Having a producer and a consumer task in different projects, you can easily define a cross-project task dependency (also called an execution dependency). If, on the other hand, the configuration of one project depends on the configuration of another project, you can specify a configuration dependency between the two projects.
You already saw a third type of inter-project dependency in the section regarding (library) dependencies. If a project depends on the artifacts (such as compiled Java classes) of another project, you can define this in the dependencies configuration:
dependencies {
    compile project(':projectA')
}
This lets Gradle build projectA before the project declaring the dependency, and put the artifacts generated by projectA on the compile classpath of the declaring project.
In a nutshell, when doing multi project builds Gradle (as in other areas) provides every feature you could wish for. In the future Gradle will also allow parallel execution of the build for different subprojects, which should give a big boost in build performance on modern CPUs if you have a lot of (independent) subprojects. (The feature is already incubating.)
Conclusion
It is impossible to show every aspect of Gradle in this article, so I had to leave out many interesting features. One of the most useful in daily developer life is the Gradle daemon. By setting a simple system property (which might, for example, be done globally in a properties file in your home directory), you can advise Gradle to manage a set of “background build daemons” to execute your builds. If you execute a gradle command, Gradle will look for a running build daemon. If a daemon is already running, Gradle will use it to execute the build, otherwise it will start a new daemon. For repeated builds (as it is common in a developers life), this saves the startup time of the Java runtime. After some idle time the daemons will automatically shut down again. Apart from setting the system property everything works completely transparent to the developers. (Note that I did not analyze the security of this setup; on multi-user machines with untrusted users it might be advisable to abstain from using the daemon.)
On my machine using the daemon (once it is started) reduces the execution time of simple tasks from up to ten seconds to less than one. Though the absolute saving in terms of seconds per workday is minimal, the psychological effect is significant; the build actions feel “quicker” and there is less mental interruption caused by the enforced short breaks when a build command is executed.
Where There is Light …
Gradle, like any software existing in reality, is not perfect. It is also still a young tool and there is a lot of development going on. That said I really struggle to find arguments against Gradle.
The implementation is very solid. While there certainly are bugs, I personally never encountered one, not even with pre-1.0 versions. The documentation is exemplary. There is a very good User Guide which provides a great introduction into all aspects of Gradle and quick solutions for common questions and problems. If you get deeper into the Gradle internas, there are well maintained DSL Reference, Javadocs and Groovydocs
While new Gradle releases are published regularly, new releases will normally execute existing build scripts without any changes. Even my very first Gradle scripts from Gradle 1.0 and before still work with the current Gradle versions. (I get a few deprecation warnings because the handling of extra properties has been modified, but the old style is still supported and the change to get rid of the deprecated statements is trivial.)
Especially for Java programmers without any Groovy experience, the initial learning curve will be a bit steep. You might initially get away with copying and modifying the examples from the User Guide, but to actually understand the build scripts you will need at least basic knowledge of Groovy and important Groovy concepts such as closures.
That said, since Groovy is more of a (very impressive) extension to Java than a language on its own, learning Groovy is not difficult for an experienced Java developer. And once you know Groovy you will immediately feel at home with Gradle. After scanning through the User Guide you will be able to build your average Java project without problems. And after learning a bit about the Gradle API even solving tricky custom problems will feel amazingly natural and easy.
… There is Shadow
There is probably a single big problem with Gradle which inherently lies in its power and flexibility. Other than Maven Gradle will force you much less to comply with any best practices or conventions. While there certainly are defaults and recommendations, it essentially is up to you to follow them or not. Gradle gives you the full freedom. (In that respect it resembles Ant much more than Maven.)
Using Maven as a build tool you will not need to define a lot of conventions, since most of them are already predetermined by the tool. And someone knowing Maven will immediately know his way around any typical Maven project.
With Gradle there are much more options. You could use it like Maven, mostly applying standard plugins and statically configuring these plugins. You can put complex build logic in build.gradle scripts for each project, or put all your build logic in the root projects build.gradle script and inject it into subprojects. You might decide to use the buildSrc meta project to collect your build logic or even setup a distinct project for your own Gradle extension library. And no one will stop you to mix all of these options.
This flexibility is Gradle’s distinct feature. Where Maven looks for its dependencies in one or multiple Maven repositories, Gradle can access Maven or Ivy repositories as well as simple directories containing JAR files without any meta information. And again, you can mix all of these repository types in the same project. While Maven does not have a built-in way to simply copy an arbitrary file from one directory to another as part of a build, and Ant provides a single (though very powerful) copy command, Gradle not only allows you to use the original Ant copy command from Gradle scripts, you can also use the Java standard API, several convenience functions from Groovy or (if you like so) the Apache Commons IO library (automatically downloaded from Maven Central as a build script dependency).
Thanks to Groovy, the flexibility reaches down to the lowest syntactical level. In Java there is about one way to append the string "foo" to a StringBuilder: sb.append("foo");. This works in Groovy as well, but if you like you can leave away the parentheses or the semicolon or both: sb.append "foo". And thanks to operator overloading, this is equivalent: sb << "foo". (For a Java programmer without Groovy experience these variations can be quite confusing.)
But with great power comes great responsibility. Developing Gradle scripts demands for more discipline and planning than configuring a Maven build. Gradle makes it easy to produce unreadable spaghetti code in your build scripts which not even the original programmer understands anymore. And Gradle makes it easy to mix contradictory styles and conventions in a single project tree.
For a Gradle project, you will want to (formally or informally) define “custom conventions” specific to your project (such as how to manage the third-party dependencies, what directory layout style to choose or where to put build logic for subprojects). If you (your company, your institution) use Gradle for all your different projects, you will probably want to define (and document) common conventions for all projects of a certain type. This is the point where you should consider writing your own Gradle plugins developed in a distinct project. Using such plugins, the build script for a new “conforming” project of a specific type can be as simple as applying a single (custom) plugin.
Gradle does not force you to go to these lengths. A lot of decisions are up to you and there are no generally true answers. It will require knowledge, experience, time and some talent to engineer “good” Gradle builds which are also easily understood by others. Even then, Gradle builds applying styles and conventions unkown to you will be more difficult to understand than your average standard Maven build. Often some documentation will be necessary to make sophisticated Gradle builds understandable to others.
Gradle is a powerful tool but it needs to be controlled by competent developers.
The Future
Gradle is not finished yet. An important issue for future releases will be the parallelization of build tasks. And certainly many plugins for other languages apart from Java, Groovy, Scala and C++ will be developed, as well as plugins for all the common third party tools.
Still, some well-known open source projects already use Gradle:
- Gant (This is somewhat perplexing since Gant is itself a, though much simpler, build tool providing a way to script Ant tasks using Groovy. As such it actually gave much inspiration to the development of Gradle itself.)
- Grails
- Hibernate
- Mockito
- Spring
And it seems that by now numerous big commercial projects are being built by Gradle. (Gradleware provides commercial support and training.) Last but not least Gradle will also be the future standard build tool for Android projects.
From my personal experience with Gradle I have no doubt that Ant and also Maven will be considered “legacy tools” in the near future. New projects in the Java multiverse will more and more use Gradle from the start, and existing project will migrate to Gradle sooner or later.
If you are concerned with Java related build engineering and want to be prepared for the future, I can only recommend to learn Groovy and get your feet wet with Gradle.
References
- Gradle to the Rescue, Part 1 – We Need a Better Build Tool
- Gradle to the Rescue, Part 2 – The Gradle Experience
- Gradle to the Rescue, Part 3 – Gradle vs. Maven
- Gradle Homepage: http://www.gradle.org/
- Gradle User Guide: http://www.gradle.org/docs/current/userguide/userguide.html
- Gradle DSL Reference: http://www.gradle.org/docs/current/dsl/
- Gradle Javadoc: http://www.gradle.org/docs/current/javadoc/
- Gradle Groovydoc: http://www.gradle.org/docs/current/groovydoc/
- Groovy Homepage: http://groovy.codehaus.org/
- Maven Homepage: https://maven.apache.org/
- Ant Homepage: https://ant.apache.org/