In the first part of this blog series we have forked Point Software’s Scala Hack Session and cloned a remote repository on a local machine using EGit. In this second part you will learn how to make changes, use branches, commit on your local repository and then pushing it all to your remote project.
As you will see below you will get a better understanding of Git and GitHub, learn to use best practices and avoid some obstacles.
Git Basics
Git Data Structure
Before I start you should understand some part of Git’s basic structure and concepts. An excellent reference is the Pro Git book which is also available online. This diagram illustrates Git’s data structure:
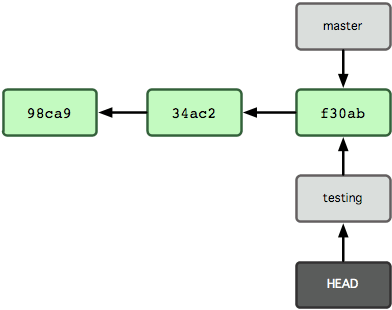
Source: What a Branch Is
There are 3 kinds of objects shown:
- Commit objects are marked in green. There are 4 commits and each commit is chained with the previous (parent) commit.
- Branch pointers like the master branch is created by default. In addition another branch ‘testing’ has been manually created.
- A HEAD pointer is where you are working on. You can checkout to any branch and the HEAD is then pointed there.
[Quiz] In case you are working on the testing branch and have committed your changes. Can you explain how the data structure will change?
[Answer] The new Git structure will look as follows:
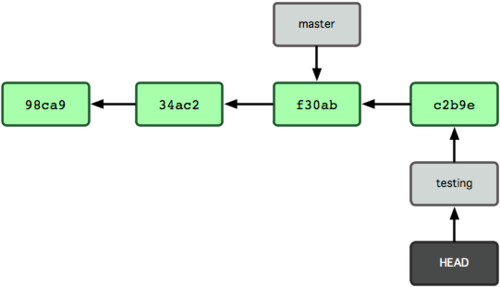
- A new commit object is created and chained with the most right, parent commit object in the diagram.
- The testing branch is moved and pointing to the latest commit.
- The HEAD pointer is moved automatically with the testing branch since it is pointing to this branch.
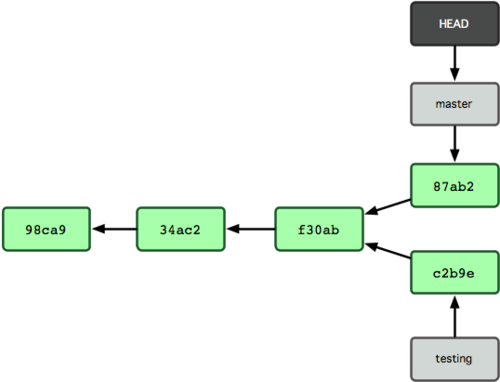
In case you switch back to the master branch and do a commit it looks like this:
Let us check how this looks like for the Scala Hack Session project:
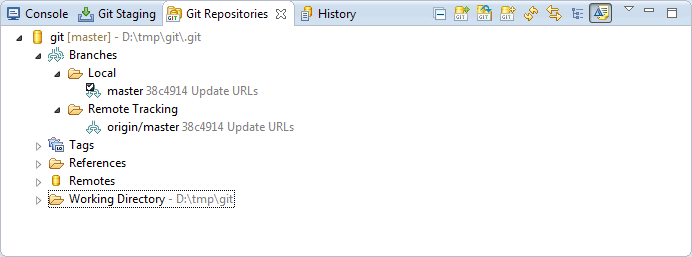
My local master branch is pointing to the latest commit. The commit id ’38c4914′ is a SHA-1 hash. Since I have cloned it from my forked repository you can see that there is also a remote master branch called ‘origin/master’ with exactly the same SHA-1 hash.
Everytime when clone, push to, pull from or fetch from a remote repository is triggered all data in my local Git and its structure is synchronized including all branches, commits and tags you have made.
Branches
Branches has been stated by many developers as the killer feature of Git. In Git it is a best practice to always work with other branches and NOT with the master branch. Using and creating as many branches as you want for topics or features allow you to manage your development on a day-to-day and task-to-task basis.
In case you have to switch to another task like an emergency bug fix or another feature providing an interface for your colleague you can easily create a branch. A branch can be created from any commit point: on your current working branch, the master branch or on any other commit. This way you can define your branch based on a single task. At the end of the day you can merge all finished branches together and back to the master branch… and believe me: in Git merging is less a pain (when you know how :-)) compared to other SCM tools.
In fact with Git you can define your development workflow by different branches:
Long-Running Branches
A good example for long-running branches are release branches like the master branch being the latest release where developers are working on. The master and release branches contains code that has been or will be released. These branches are considered as stable. Other possible branches are development and test branches for different levels of stability and environments for the development and testing teams.
Topic Branches
Git allows you to merge your branch into other branches as often as you want. A topic branch is a short-lived branch. Usually you define them for features and bug-fixes.
EGit for Branches
Unlike other SCM tools a branch in Git does not clone or duplicate data within the repository. Instead it uses pointers referencing to different commits. For a better understanding it helps to check the EGit history view:
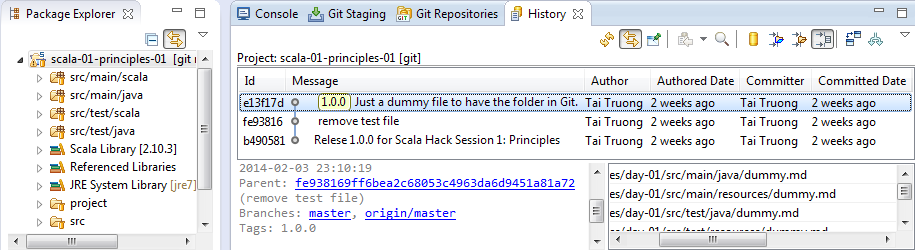
On the left panel in the package explorer I can right-click on the project ‘scala-01-principles-01′ and select ‘Team>Show in History’. The result is then shown on the right panel where you can see 3 commits. I can select a commit on the graph in the history view for getting the details underneath: the parent (previous) commit, the affected branches (master and origin/master), the author, commit date, and affected files.
[Quiz] Look closer at the commits. Do you find the glitch in the matrix here?
Yes right, the latest commit shown in the Git history view has an id ‘e13f17d’ where the latest commit in the Git repositories view shows an id ’38c4914′ on the master branch. How can that be? Don’t panic, take your towel and let me clarify this. Navigate to the folder src/main/scala in your package explorer. You will see one commit entry with id ‘b49081′ in the history view. ‘Well okay,…’, you may say, ‘… but shouldn’t I see the latest commit when I navigate on the top folder of the project?’. In most cases you might be right, but it depends on how the structure is organized on your remote repository on GitHub. Navigating through my local or GitHub repository you can see that the Eclipse project ‘scala-01-principles-01′ is in subfolder ’01-principles/day-01′:

As expected in the browser on the far right the latest commit to this folder has the id ‘e13f17d’. Navigating back to the top there is the latest commit with id ’38c4914′ for the master branch . In case you are curious about what has been changed in this commit you can click on the id and you will see that the readme file has been changed.
Tags
For the sake of completeness I just want to briefly mention tags. Git of course can create tags like marking certain releases. Actually Git allows to have two kinds of tags: annotated and lightweight tags. For more details read here.
Advantages of Using Branches: A Typical Scenario
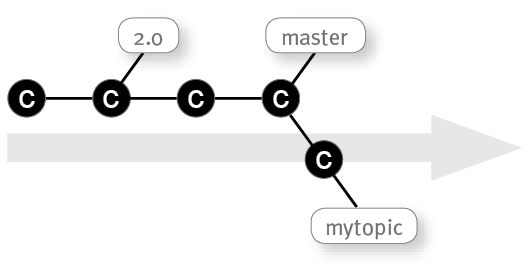
Imagine you are working on a topic: first you create a new topic on top of a master branch, then you finish and commit your changes on your topic branch:
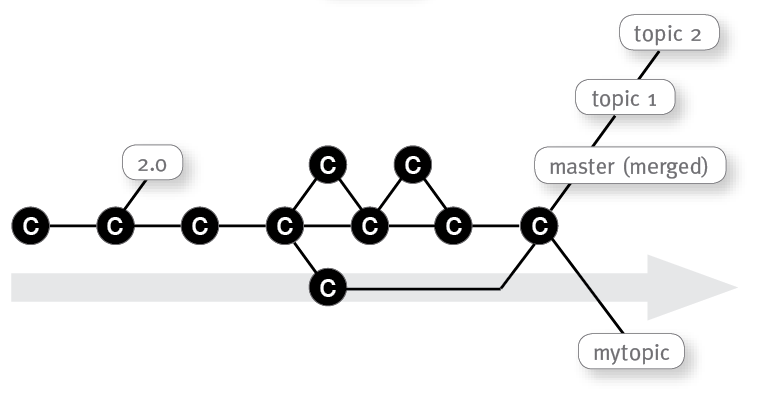
Next, you pull all changes from the remote repository:

Here you can see that other developers have been working on two other topic branches and merged them into the master. It might be not obvious:
The pull will never result into a merge conflict because you were not working on the master branch. In case you work directly on your master it is recommended to fetch first and then merge instead of pulling. This allows you to check first the remote changes before you merge them with your local changes and running into some conflicts. Here is an explaination of why you should fetch and avoid pull. The difference between fetch and pull is explained in detail here.
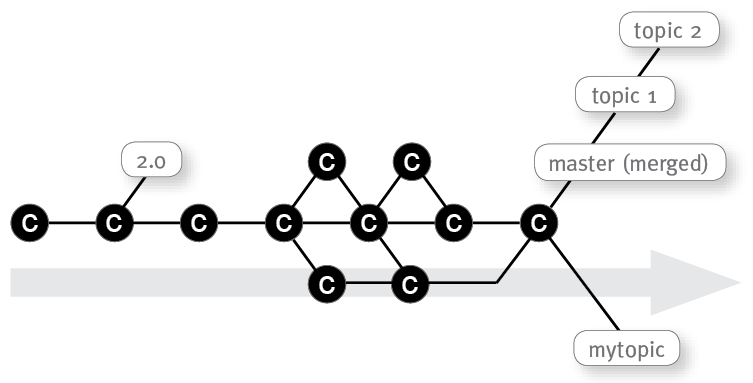
This allows you to verify the master changes first. Now you can merge your branch with the master. Ideally no conflict appears and results in a new merge commit where all branches are pointing to:
Next, you can push the result back to the remote repository. But what if the merged results into a conflict? You can manually resolve the conflicts, commit the changes and then finally push it. In some cases you realize the changes from the other topics are too big. You can decide to merge your branch in several and smaller merge steps with one of the previous commits before the master branch. In this example you merge with a commit with smaller changes like a minor bug fix:
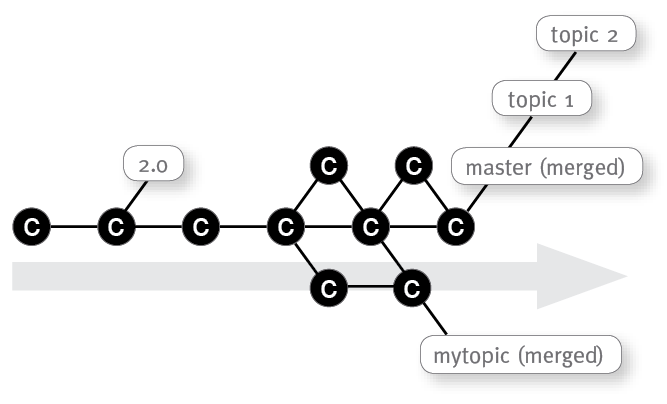
Finally you merge again, this time with the master branch containing a bigger commit like a major refactoring:
In the next part I will demo you based on the hack session how you deal with your IDE, doing commits, working with branches, merging into your local Git, and finally pushing it to your remote GitHub project.